Tuesday 28 June 2011

Tunnel top / Panel sealing

Tuesday 28th June
Decided to wait for the plates (to lift the engine) to arrive before doing any more work on the engine, so carried on with the ally panels. Made the top tunnel panel, I decided to do this in two parts, I will rivet the front part and have the rear section removable to get at the handbrake adjuster. I made both sections 15mm wider than the tunnel on each side, I could then bend the edges over to get better / cleaner finish. Couldn’t fit them yet as I am still waiting for the handbrake leave to arrive, I also need to get some draft excluder for panels I am going have removable to seal them.


Found the reversing light switch and fitted it to the gearbox

Decided to seal all the ally panels (where fitted) so used some masking tape to get nice clean edges (didn’t work that well on some parts due to the rivets), I also noticed on the drivers side where the chassis has two bars welded together (one on top of the other for strength) it was welded every few inches, but between the welds I could see daylight, so sealed those up as well.


Throttle Bodies / Gear linkage / Alternator top bracket

Monday 27th June
Called tiger today to ask about the clearance on the starter motor, there are two types of mount they supply, racing ones (these are what I have got fitted) and normal ones. The racing ones are a lot harder (less movement) than the normal ones, but are on the downside a few mm shorter, this is why the starter motor is so close to the chassis. Tiger suggested to put some spacers below it to rise it up a few mm, I have ordered some 6mm thick steel and will place this under each mount when it arrives.

Fitted the remote gear linkage as supplied by tiger, this is straight forward enough, just remove the end cap in the rear of the gearbox ( I knocked this out with a long extension bar and a hammer) feed the linkage through the hole and the fixing plate over the top, then bolt in where the gearstick normally goes


Back to the throttle bodies, reapplied the silicon gasket sealer, this time I smeared it all over with my finger, using it very sparingly but ensured all the surface was covered, fitted to the engine, tightened down the nuts and prayed that there was no spillage into the chambers, opened the throttle and looked past the butterflies, hooray no sealant had oozed into the chambers J


Fitted the throttle cables to the bodies, then turned my attention to the accelerator pedal, fitted the linkage that comes with the throttle body kit, I drilled the plate on top of the pedal and fixed the block to the pedal, I then drilled another 2 holes using the block as a template to get the cable holes in the right place. I then drilled two 6.5mm holes 20mm apart in the upright off the chassis the pass the cables through and fitted the adjusters supplied with kit into the 6.5mm holes.


The throttle pedal seemed a bit stiff when pressed, when I was assembling the throttle linkage, in the instructions it says the rod should be 80mm long but it would only adjust down to 90mm. You can see the angle in the picture below, this doesn’t look right.


So I took the rod off, shortened the rod by cutting some each end then readjusted, even now I can only get it to 85mm and the throttle still seems a bit stiff. Will look at this later.


Fitted the top alternator bracket with the appropriate spacers


Cut down the studs on the front of the engine and fitted the pulley belt


Monday 27 June 2011

Radiator / Throttle Bodies

Sunday 26th June
Fitted the radiator, this was a bit of a fiddle and took a lot more time than I though it would. I had to construct some brackets for the bottom mount of the radiator, the bar they sit on is bent to stop it slipping off the end (away from the engine), but there was nothing to stop it the other way (towards the engine). Made and fitted the brackets, then lined the brackets with foam and fitted the radiator, put on the top mounting bracket that was supplied by tiger, drilled the appropriate hole and fixed it in place.


Measured and cut some of the water pipes to length, will fit these later on though,

Decided to build up the throttle linkage on the throttle bodies and then fit them, used the appropriate silicone gasket sealant, I put it on in what I thought was very sparingly, however once I fitted and bolted up the throttle bodies I thought I would check inside (by opening the throttle linkage and looking past the butterflies) to ensure that no sealant had oozed into the chambers, it had L , this is not good as it would obstruct and create turbulence to the airflow and would effect performance. So off they come, I cleaned all the silicone off the head and off the manifold of the throttle bodies, time to call it a night.


Engine and Gearbox Fitting

Saturday 25th June
Fitted the engine & gearbox today, used the hired engine hoist to drop the engine into the chassis, used some wooden blocks (50mm depth) in place of the engine mounts so I could drill the holes. I got the missus to help me line the prop shaft up with the gearbox and wiggled it into place, went in quite easy. Once I was happy with the position I then drilled down through the wooden blocks and through the chassis, raised the engine off the wooden blocks, cleaned away all the sawdust and swarf, then dropped the rubber mounts in, bolted these up, used a trolley jack to hold the gearbox end up and then removed the engine hoist.
Fitted the gearbox mount, this went on easy enough.


Fitted the starter motor, it is really close to the chassis.


Will talk to tiger about this on Monday; think I may have to put some spacers under the mount to raise it up a few mm.

Fitted the alternator lower brackets, the fitted the alternator temporary in place so I could see where to the fit the top adjuster bracket, to fit this the throttle bodies need to be mounted as it bolts on to the 2 studs at the front end of the engine, these studs are part of the throttle bodies mounting. Reading through the Alpha throttle bodies fitting instructions it tells you to remove all the original studs / bolts in the head that the original inlet manifold fitted to and replace with the provided ones. I fitted 8 of the new ones and used the 2 original longer studs that where supplied with the original manifold (this is a brand new engine anyway so the studs have had no stress / pressure put on them yet) by using these longer studs I will have enough space to fit the throttle bodies and the spacers and bracket required for top alternator bracket. If you look at the picture below you can see the difference in the studs.


Fitted the extra pulley which was supplied by tiger, will need to cut the studs down though as the fan belt passes over where these are at the moment


Fitted the clutch cable, I made up a bracket to hold the cable secure in the engine bay, I lined the bracket with rubber to prevent any chaffing.


Fitted the pedal side with the nut and bolt setup, I passed the cable through the hole in the bell housing and then fitted the nipple end into the fork on the gearbox as I was adjusting this the pedal fell to floor, I had a look and noticed I had fitted the pedal bracket wrong way round, so the stop was on the back and not the front. Put this right and readjusted the cable, the clutch now works in a smooth motion.

Friday 24 June 2011

ERA sump finished Engine & Gearbox mated / Rolling chassis

Friday 24th June
Went into town today and had the tyres fitted J then popped to local motor factors to pick up gasket paper, clutch alignment tool and thought I would get some fully synthetic oil while I was there, forgot to pick up diff and gear box oil though L. Also popped to the local tool hire company and hired the engine hoist that will be needed for the engine fit. Fitted the clutch spigot bearing and pressure plate.

Made the gasket for the oil pickup, fitted the oil pickup with 9mm of clearance from the bottom of the sump (measured this with some blue tack). While doing a dry fit of the ERA sump (no gasket) noticed that the bolt holes didn’t line up correctly, looks like I got the same problem as Dave T who also has a blog going at the moment with a tiger avon build, by the way thanks Dave (if you ever read this blog) as your blog has given me good guidance to the build, especially as there is no build manual supplied with the kit. Basically the sump fowls on the oil pickup, so out with the air file and a couple of minutes had it fitting nice.

Fitted the wheels, I am now at the rolling chassis stage J


Fitted the new clutch fork and thrust bearing, then mounted the gearbox to the engine, this went in surprisingly easy and 5 bolts were thread locked and torqued into place.

Had to cut one of the mounts to fit around the water pump housing, didn’t take too long.

Already now for the engine fitting tomorrow

Thursday 23 June 2011

Engine / Tiger ERA sump

Thursday 23rd June
Fitted the fly wheel, I had to file done some washers for them to fit the new lightened flywheel.

Removed the standard inlet and outlet manifolds that come with engine as new.


Then turned my attention to removing the sump and lower crank case to fit the Tiger ERA sump, I should have checked the engine first for oil doh!!!! So quickly retightened the sump bolts and put back upright and drained the oil. Removed the steel sump, then the lower crank case. You have to replace four bolts in two of the main bearing end caps with Silver Top Zetec bolts that have a threaded stud on the top,  steel spacers are added to allow the windage tray to be at the right height.


Went to fit the new modified oil pickup, but have no new gasket to put on it and there’s not one supplied with the kit L so need to take a trip to the motor factors tomorrow, I also need to purchase a clutch alignment tool so I can fit the new clutch and pressure plate.

Also called Tiger today to find out where my tyres are, here there is an issue. Tiger normally supply Toyo T1Rs 195 X 50 X 15 with there kit cars but due to the disaster in Japan these are all on back order and wont be in stock until July sometime. As you read previously, this is now holding me up as need to get the chassis on the ground so I can fit the engine. So had a discussion with Laura from tiger and she suggested I try some local tyres dealers to see what I could get, so I phone around, found one who could get some Pirelli’s for tomorrow, called Laura back and told her the details / amount etc and was told, if I go ahead and get them fitted, scan the invoice and send to tiger, they would then credit my bank account with the amount of money that it cost, you cant get fairer than that J so hopefully will have the engine fitted this weekend.

Front brake pipes / Brackets / Seats / Flywheel

Wednesday 22nd June
Bought some angled ally and made the front brake pipes brackets, so completed the brake system.


Seats arrived today J


I am awaiting the tyres to arrive from Tiger (I am also still awaiting the handbrake leaver and front cycle wings). I need the tyres now so I can progress with the build. I moved onto the engine, which is a brand new unit I bought from Tiger, I removed the standard pressure plate, clutch and fly wheel, as I have upgraded & lightened parts to replace these with. The ring gear and flywheel come separate from tiger, so I done the usual trick of putting the ring into the oven and the flywheel into the freezer, this worked a treat I then let both (once mated) to cool down to room temperature.  The picture below shows the difference in the flywheels, standard on the left.


Rear brakes / Brake pedal plate

Monday 20th June
Called Tiger, yes they are suppose to be vented discs on the rear and I need to fit the top bolt prior to fitting the caliper bracket, the wrong type of bolt (cap heads) were supplied in the break kit, so I changed these for normal bolts and fitted the rear brakes. Took a bit of fiddling to get the bolts in but got there in the end.


Made and fitted plate to stop the brake pedal falling forward.


Fuel tank / Steering column / Front brake pipes

Sunday 19th June
Ok back to the rear brakes, put on the brackets for the caliper (fitted the bracket with caliper facing backwards), this was where I hit the first snag, once fitted you cannot get the top bolt that holds the caliper in place through the hole, you can only see half the hole as the upright is in the way, so took it back off, tried it on the other side (with the caliper facing front) but had the same issue, no matter what orientation you put it in, once fitted you cannot get the bolt through the hole. I did think about putting the bolt into the bracket prior to fitting, but the bolts supplied with the brake kit where cap heads, and it would be impossible to tighten it up as you won’t get the allan key in it!!!!!
Put it in place with a normal bolt so you can tighten, fitted the disc (which is vented) put the pads into the caliper then tried to fit the caliper, the caliper would not fit over the disc, it wasn’t quite in line, do I use washers or should they not be vented discs on the back? Anyway decided to leave the rear brakes until I could give tiger a call.

Fitted the wiring, I use the term fitted lightly as I have run and clipped it done the tunnel, then just coiled it up and tied it out the way.

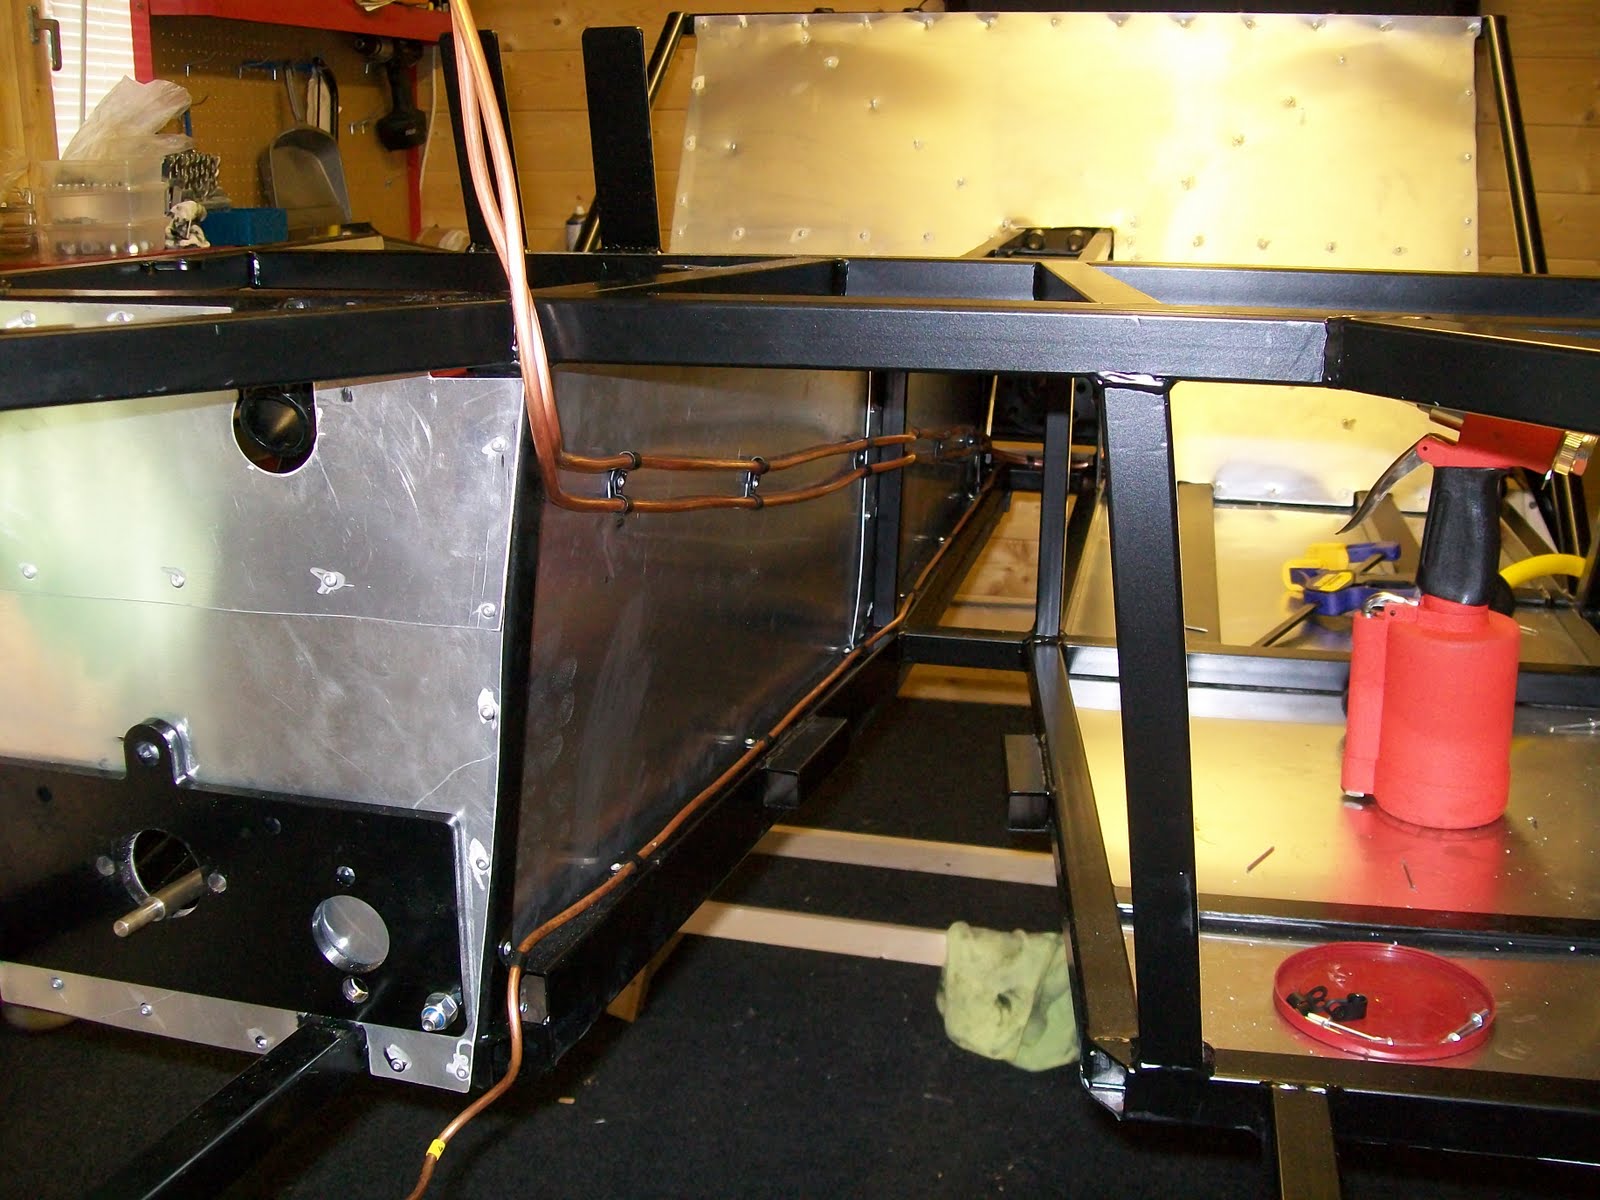
Moved onto fitting the ally fuel tank. Got this into place to find that it sits to far the drivers side (it doesn’t sit centre line of the car) is it suppose to be like this or have the brackets been welded in the wrong place, surely when the tank is full it would alter the handling of the car. Decided to cut the back drivers bracket on the tank so I could centre it better. This may come back and bite me in the ass when it comes to fitting the body as I hear tiger have moved the filler cap so you don’t need to cut away the boot, ah well time will tell. Plumbed up the feed and return to the tank.


Fitted the steering column


Fitted the master cylinder and run the front brake pipes around the engine bay. The supplied front brake pipes (complete with ends already fitted) I find are too long, I did not want to have too much excess pipe in the engine bay so I decided to cut to the correct length and re flare the ends.


More panelling / Rear suspension / Fuel sender

Saturday 18th June 
Off at 08:30 to the local (ish) garage to use there hydraulic press to fit the top metal bushes on the rear wishbones. Bushes went in really easy when using the proper tool J.
Fitted the drivers side triangle ally panel that I cut last night, then sealed up both sides with silicone.
Started on rear suspension, the bar with threaded ends for the lower wishbone was a really tight fit in the tiger fabricated upright, even though I cleaned it out first to get rid of all the powder coating. It took me about an hour to fit that one bolt!! And the only way I could get it in was beating the sh** out of it with a rubber mallet, even though I used copious amounts of oil to lubricate prior to fitting. Also fitted both drive shafts and rear hubs.

Once the wishbones were all fitted, I took one of the front shocks off and fitted it to the rear, this was so I could set up the geometry on the rear, with the front shock fitted to the back it gives you approximately the height the suspension would be sitting at with the weight of the car on it. I then set to 0 degrees (as per the book) as most of the time the car will be driven on the road, I can always alter this later if need be. I then reassembled the front shock, fitted the correct rear shocks and also fitted the drive shafts.

This kit comes with the rear disc conversion, tried to fit it but came up against a couple of problems, will try again tomorrow.

Drilled and tapped the top of the fuel tank and fitted the sender.

Rear Suspension / Fuel lines / Fuel pump

Friday 17th June
Started on the rear suspension, fitted all the poly bushes in the top and lower wishbones, tried to fit the metal / rubber bushes in the top. I was using my bench mounted vice to fit these, on the first bush I was fitting,  my vice broke!! So talked to a neighbour (the one who helped me unload the kit when it arrived) and a couple of phone calls later he had spoken to a member of his family that works in a garage and if we were there for 09:00 the following morning we could have the use of there press.
So moved onto fitting the fuel lines, as I am fitting a 2 ltr Zetec with Alpha Throttle Bodies I need a feed and return pipe. I routed these through the tunnel and up the driver’s tunnel, and P clipped all the way. I fitted the fuel pump behind the passenger side rear ally panel.


Fitted the fuel pump behind passenger side back seat plate, also plumbed in feed pipe with high pressure connector and rubber fuel pipe.


Cut the back triangle ally panels, then fitted passenger side.