Wednesday, 11 April 2012

Kitting the boot out

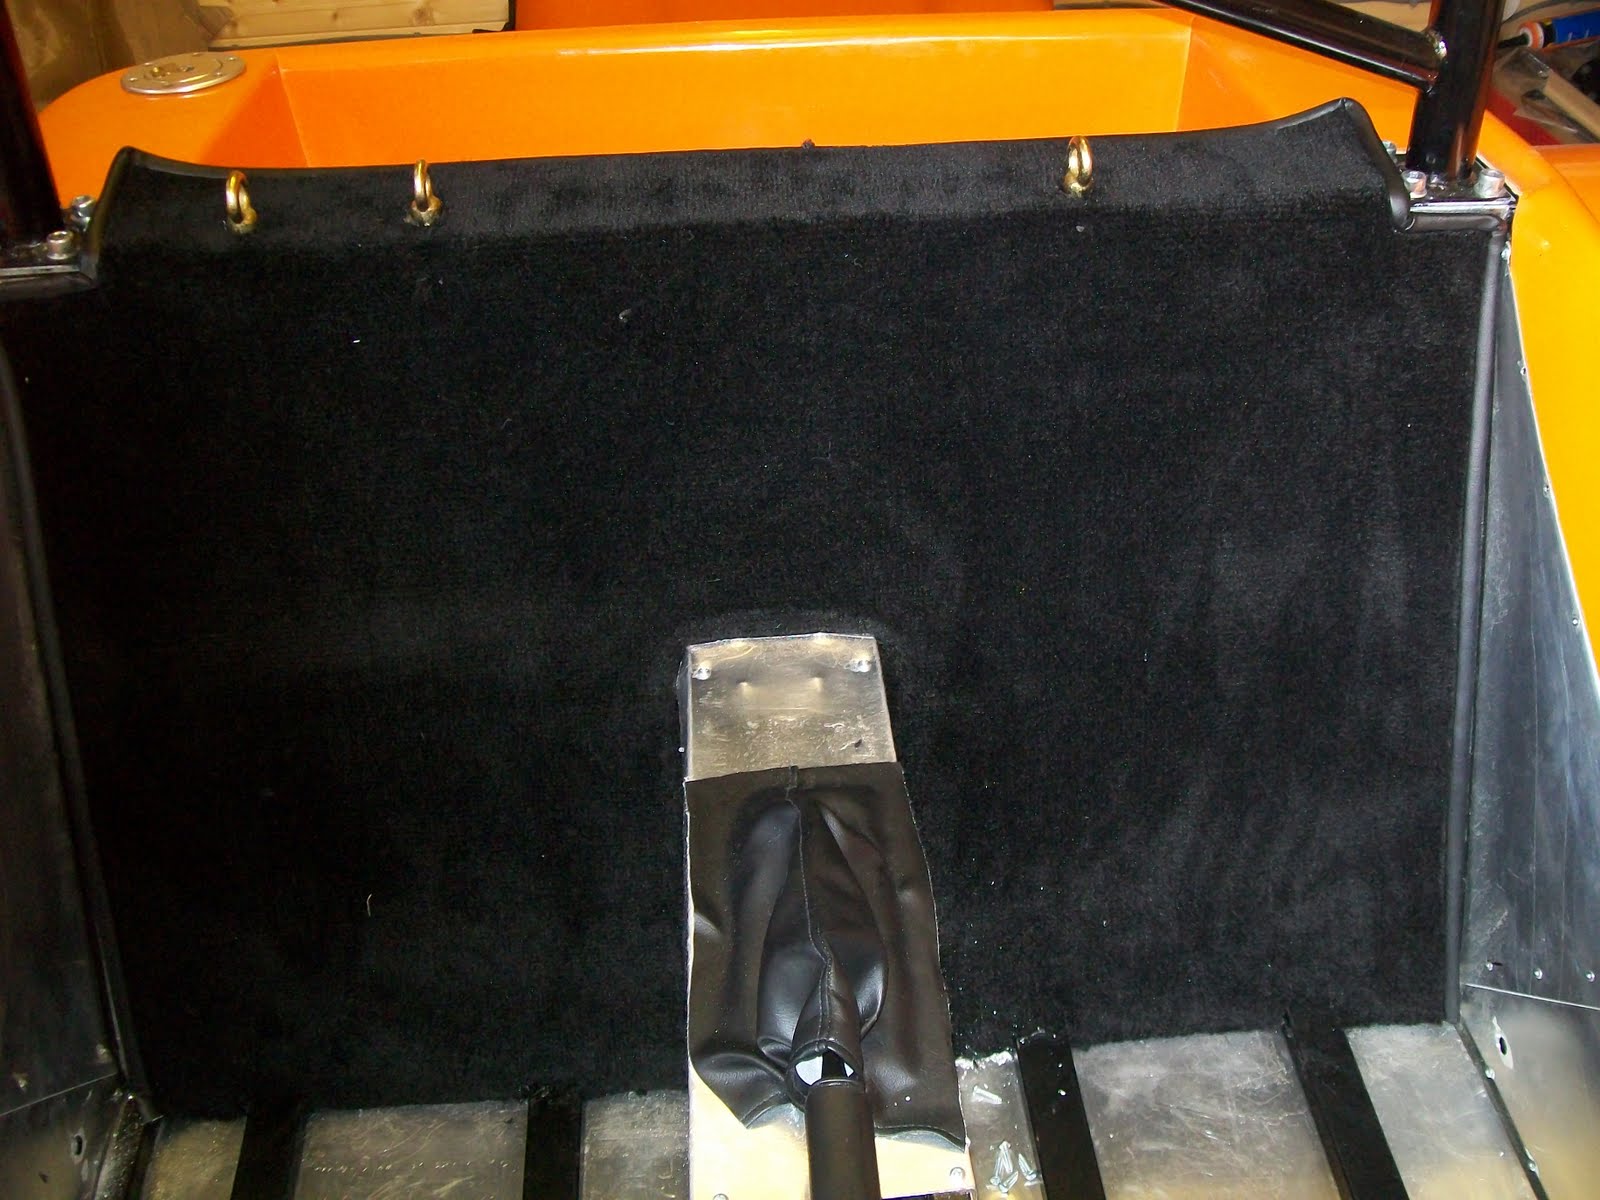
Decided to kit the boot out with some basic tools just in case required when out on the road, I didn’t want the tools rattling around while driving so I made and type of insert to go in the boot. I used 6mm ply and covered it in acoustic carpet, I also covered the sides of the boot with the acoustic carpet.


I also made a lid to go over the tools to leave a small storage space for anything, trouble is the ply has bowed since making so I need to try and straighten it or make a new one.


Monday, 9 April 2012

Painted Brake Disks

Saturday 7th April 2012

Now its done a few miles I can see where the brake pads contact the discs, where they don’t touch you can see the disc gets a covering of surface rust and this doesn’t look the best, so I took off all the discs, cleaned them up, masked off and painted the areas that get the surface rust on.


Refitted the discs to the car once all dried.


Tuesday, 3 April 2012

Clutch Pedal Modification

Thursday 29th March 2012

After driving it for a while I wasn’t happy with the clutch bite, it was not biting until close to the end of the pedal travel in its full released position, It was a new clutch so that wasn’t the problem, after looking at the clutch pedal there seemed to be a lot of travel, so I decided to make the pedal adjustable. There is a stop on the bracket at the rear bottom of the pedal, this stops the pedal falling forward once released, I drilled and tapped a 5mm hole in the stop, then fitted a small 5mm bolt with a lock nut into the hole, by adjusting the bolt it adjusts where the pedal stops.


With the bolt in the fully adjusted position lowered the bite point by quite a bit and now it is much nicer to drive and change gears. Take a look at the pictures below and you can see how much difference it has made to where the pedal sits when released on the first picture the clutch pedal is closer to the driver than the brake pedal, and the second you can see it is behind the brake pedal, further away. I should have took a picture before doing the mod but forgot to do it, but you can see the difference, the first picture is one from when I was building the car.


Oil / filter change and painting the nosecone

Sunday 25th March 2012
I have done over 500 miles now so the engine should have bedded itself in nicely, so I done the oil and filter change. I also decided to paint the inner front part of the nosecone black.

Bootlid and Doors

Saturday 24th March 2012
Fitted the lockable boot lid today, I bought 2 stainless steel hinges and two cupboard magnets to use for fitting it to the body. The boot lid has a lip all the way around in, this needed filing down to ensure it fitted into the hole flush, once I got it fitting nice I then marked up where the hinges would be fitted to the lid. The best way I found was to completely remove the lip from boot lid where the hinges fitted, I then use epoxy to fit them to lid side as I didn’t want rivets showing on top of the boot. Then I put the boot lid in place and marked and drilled the holes where I was riveting it to the body, I then fitted magnets to the body and the metal catch plates to the lid to ensure the corners were held down flush the to finish it off I applied the stripes.


The doors that Tiger supplied me arrived so I decided to fit these too, they will help keep the wind down on those longer journeys. They come with 4 barrel and pin type hinges and poppers that need to be fitted to the doors and car to keep them in place.

First I fitted the hinges to the windscreen frame

Then I fitted the poppers to the doors and also to the car, there are three fitted to the door and three to the car for each door, I popper on the outside and two on the inside. It may need more at later stage I will see how it goes.


DVLA paperwork arrives

Wednesday 21st March 2012
Tax disk and paperwork to get plates made arrived to day, so went into town and got the plates made up J, my car is now legal to drive on the road, so took it out for a its first proper run.

Monday, 19 March 2012

Seats / Steering wheel refitted

Sunday 18th March 2012

Refitted the seats and steering wheel, so now just need to wait for the registration docs to arrive.


Recarpeting the interior

Saturday 17th March 2012

Started to refit the new carpets today, I bought some acoustic carpet and spray glue for the tunnel and floors under the seats and plan to cut down the tiger supplied floor carpets for front part of the floor where your feet rest, as this carpet is harder wearing and will last longer. I done it in 7 sections, the tunnel sides first, then the rear floors, front floors and lastly the tunnel top. The tunnel top i done in 3 sections so i can easily get at the handrake adjustments etc if needed. Then i finished it off by fitting the new gearstick and handbrake surrounds and gators and lastly refitted the dash.


Interior Revamp / Gear Remote Adjustment

Friday 16th March 2012

Stripped out the seats / dash and all the interior carpeting today, this was all supplied with the kit (apart from the dash) and didn’t fit the best so I decided to redo it.

While I had all the interior out it gave me access to the gear remote, I took this apart as selecting the gears was not easy and there was quite a bit of slop in the gearstick. On checking the gearbox side of the remote there was already a saddle fitted to the shaft but I didn’t have one on the remote side, so I purchased another saddle, fitted it then refitted the tiger remote.

On the tiger remote there is an adjustable reverse stop block (this is to stop you selecting reverse when you are changing gear). To adjust this to the right position, I put the car into 1st gear, and then adjusted the block right up to the bottom of the lever. On the bottom of the lever there is a recess which can pass the reverse block when the lever is pressed down enabling you to select reverse gear. The gear change is now positive and nice and smooth, and thanks to the added saddle there is slop in the gearstick

New Dash and Stoneguards

Thursday 15th March 2012

Still waiting to hear from the DVLA.
Decided to change the dash on the car as I was not too happy with the finish on the first one I made. I bought some decent carbon wrap to cover the new dash with and I used thinner ply this time 6mm instead of 9mm. I am quite pleased with the result.


I also made some stone guards for the rear wheel arches, these were made using aluminium and then covered these in the same carbon wrap as I bought for the dash. T


Friday, 9 March 2012

Post IVA

Saturday 3rd March 2012
Spent the day in the garage today working on the car. I removed the ugly extensions off the front indicators that were required for the IVA, I also fitted the sporty steering wheel.


Then I fitted the pedal box cover, I had to cut away OS bottom of the pedal box to allow the bonnet to fit correctly, I am not 100% happy with this so will improve / modify it in the future


Time to fit the windscreen, this was a pain in the ass, the curve on the bottom of the glass does not match the curve of the car perfectly so it is hard to get it level, it took a bit of tinkering but got there in the end


Monday 5th March 2012

Ok off to the DVLA today to register the car, I filled in all the paperwork and paid the registration fee and for tax, I was then told that they only register kit cars every other week and there was no one in the office who could do it this week. They took my phone number and said they would be in touch if they needed anymore info and that they would process the paperwork next week. So it’s just a waiting game now.

Car more or less finished

IVA Update

Wednesday 29th   Feb 2012

Ok no updates for a while due to Christmas and work commitments. So since the first IVA date and the mess up with the chassis number, I have had to take it back for retests 3 times, basically the main issue was the rear brakes over braking and the speedo not reading correctly.

I found the issue with the brakes, when I fitted the master cylinder and then the brake pedal, the pushrod bar that goes from the pedal into the master cylinder was not in line, it was out by approximately 10mm, so when the brake pedal was being pushed with any great force, like it is in the test, the end of the bar which is located in the master cylinder was bending and not releasing all the pressure off the brakes, this was also the cause of the binding brakes that happened after every test. I just drilled another hole 10mm higher in the brake pedal so the bar now runs in line when pressed.

The speedo issue was little harder to work out, I called Tiger who put me onto ETB (the people who made the speedo). I explained to them how I had fitted the sensor and the magnets to the car / prop shaft, there was no issue here. I gave ETB the diff ratio and the tyre size, he then told me to input the pulses manually into the speedo instead of using the auto calibrate, this I did and still no change, it would rise upto 30mph then just jump to over 70mph (I had the car up on axle stands). Anyway after some head scratching I took look at the magnets I had fitted in the prop, I fitted these by drilling 2 small recesses into the prop flange to seat the magnets I then put epoxy over the top to stop them moving, when I drilled the holes I had drilled one slightly deeper than the other, so the magnets where different heights. I removed one of the magnets and halved the amount of impulses I had entered into the clock and tried it again, it run smooth and perfect with no jumping at all, so issue resolved.

I had rebooked the test for this day 29th Feb 2012, so I hire a trailer took it back to chadderton and it passed J .

Monday, 3 October 2011

IVA Update

Monday 3rd  October
Ok took the car for the test and it fell at the first hurdle L I booked the test and completed all the paperwork off the invoice I received with the kit when I bought it, unfortunately tiger had made a mistake with the chassis number on the paperwork, the chassis number on the car finished with a 4 and the paperwork finished with a 5, therefore the tester could not identify the car and was not able to continue with the test. To add insult to injury, as the car didn’t get tested and it was a paperwork error I would have to pay the full retest fee of £450 again!!!

On the way home for from the test we pulled in at a services on the M56, I called the insurance company and changed the details of the chassis number so I was covered, I then drove the car the rest of the way home, that at least put a smile on my face J

Called tiger once I got home to explain about the issues I had with the paperwork, they couldn’t understand what had gone wrong and said they would investigate and call me back. Approx 15mins later Laura called me back and apologized, she had made a mistake on the invoice and the chassis number on the car was the correct one and the paperwork was wrong, Laura also told me tiger would pay for the retest, do any paperwork that was necessary and they also compensated me for my hassle, which I think is excellent customer service so thanks tiger J

I now have a new test date of October 7th so hopefully things will be ok this time. After the tester done the paperwork he spent approx an hour going over my car to see if there was anything I needed to put right prior to going back for the next test, which was very good of him as he didn’t have to do this J there were a few issues that he pointed out which I have now put right, we will see on the 7th J.

Tuesday, 20 September 2011

IVA Test Date

Tuesday 20th September
Ok no updates for a while as I have been waiting for a date for my IVA test, eventually after some paper work going missing at the DVLA I finally have my date, it is booked into Chadderton in Manchester on the 27th September, which also happens to be my birthday J so hopefully that is a good sign

Monday, 22 August 2011

Wing Mirrors / IVA Ready

Sunday 28th August
Prepared the screen for fitting today, this will be fitted after the IVA as it is not a requirement for the test, however the top fitting holes for the windscreen are also where the wing mirrors fit. So I marked out where the screen will fit, assembled the screen uprights to screen frame, place it on the car and marked out the holes for the wing mirrors. The car is now ready for the test (hopefully) J.


The Car Finished, well ready for IVA anyway I still have a few jobs to do but these can wait until the IVA is done


Cycle wing stays bottom bolt

Saturday 27th August
Had a bit of a nightmare today, I was putting the bottom bolts onto the cycle wing stays, these will hold the cycle wing stay uprights away from the tyre, the drivers went in no problem, but when I put the passenger side the bloody bolt snapped, this meant that a quick 5 minute job turned into a couple of hrs L. I had to remove the from passenger side hub, drill out the snapped bolt, this meant that I no longer had a threaded hole to put a new bolt back into, so while the hub was disassembled, I put a longer bolt through the hole and welded the head to hub, this worked fine so reassemble the hub and put it back on the car.

IVA Payment

Friday 26th August
Had a phone call from the DVLA, they have taken payment for the IVA test so hopefully a date should follow soon.

Battery location

Monday 15th August

Sent off al the paperwork today for the IVA test that car requires to be road legal. Need to wait now for them to ring me for payment, and then hopefully some time after that I will get my test date.
Swapped battery and the water expansion tank, as the bonnet was hitting the top of the battery.


Decided to fit some stripes on the car to break up all the orange on the front. I decided on a 3 piece stripe, one wide in the centre with 2 smaller ones on either side.


Battery tie down

Sunday 7th August
Fitted the fabricated battery tray by riveting it into place, I then used the tiger supplied bonnet springs with a fabricated ally strap to hold the battery down.


Saturday, 13 August 2011

Interior / Temp sender

Saturday 6th August
Fitted all the carpets, then fitted the seats, this quite a fiddly job and took a while. Also fitted the four point harnesses, as they need to be bolted in prior to the seats going in


Parts for the temperature sender arrived today, so fitted those, had a few problems with cooling system, the gauge was reading 40 degrees, however the fan was cutting in, which happens at approx 90 – 95 degrees, so I took the thermostat out, cut all the centre out of it (the bit that opens and closes when it reaches temperature) refitted the o ring to the outer part and refitted it in the car, the cooling is now sorted, and works as it should.


Fitted the trims around the front cycle wings, fitted caps to the bolts where needed, covered the steering arms with some rubber hose and tie wraps, all the above should now meet the required radius on the external protrusions.


Sunday 7th August
Fitted the fabricated battery tray by riveting it into place, I then used the tiger supplied bonnet springs with a fabricated ally strap to hold the battery down.


Tuesday, 2 August 2011

Dash and instruments

Sunday 31st July
Fitted the dash and instruments (went a bit wrong here, as i cut the holes in the vinyl I cut too much away on the oil pressure gauge, you can see the foam at the edge of the clock. I intend to change the dash once through IVA as there are a few things i am not happy with) put all the clocks, switches and warning lights in the dash, then rested it on the tunnel while I wired it up. I had to extend the wires for the fog light as they would not reach where I had put the switch, I also had to extend the wires for the warning lights on the alpha loom. Once all were wired I then tidied up all the extended wiring on the rear with insulation tape, then tie wrapped it up to get it as neat as possible. Also fitted the rear carpet.